
From real bride Lindsey: "Hello Marry You Me followers! I am so excited to be sharing some of our wedding DIY's with you all. I really enjoyed doing these projects and I hope you all find some inspiration in them. Although the wedding fun is over, being married is awesome and I am having a blast making DIY projects for our new home!"
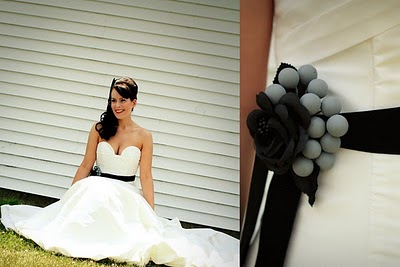
DIY Dress Sash

Supplies:
1 6ft. roll of 1.5-2" black velvet ribbon from Hobby Lobby- $3.991 black rose from Hobby Lobby (found in the bridal aisle)- $. 99


1 small sturdy brush from Jo-Ann Fabrics- $ .99
A few safety pins you have laying aroundTotal estimated cost: $8.39 if you pay full price for everything, which I did not! Hobby Lobby was having a 50% Bridal Event the week of my wedding so that’s when I got my sash supplies. Hobby Lobby also has ribbon by the roll for 50% off about every other week.
How-To:
1. Wrap ribbon around waist to desired fit and pin. I wore mine at my natural waistline (the smallest part of the waist). You could tie a bow, but I wanted the ribbon to hang down my dress and it was the perfect length… no cutting required!2. Pin the flower on the ribbon. Make sure to hide the stem.
3. Paint the berries grey or your desired color! If you are covering a darker color, make sure you buy opaque paint or you’ll be painting forever and get nowhere! This particular paint left a nice matte finish to the berries which I loved. I also cut the leaves off the branch.
4. Wait for it to dry and pin the branch onto the ribbon - fanning out the berries if you like or leaving them clustered.
5. Make sure if you plan on using the bathroom that day that the sash can be easily removed if you have to remove your dress!

DIY Cake Table Sign

Supplies:
A small black easel from Wal-Mart - $2.99A white canvas from Big Lots - $3
1 sample of fabric from Jo-Ann Fabrics (along the fabric wall) - $1.99
1 thick piece of Scrapbook paper from Jo-Ann Fabrics - $ .99
Buttons from Jo-Ann Fabrics used in other crafts
2 salt and pepper shakers from Wal-Mart (or find vintage ones at a thrift store) - $2
Tulle for bride shaker - free to me (check clearance fabric bin at Hobby Lobby)
(Amish) Hat for groom shaker at Hobby Lobby in doll section (my mom cut it to look like a fedora!) - $ .99
1 bird stamp at Hobby Lobby - $5.49
1 set of alphabet stamps from Hobby Lobby - $5.99

Total cost estimate: $26.29 if you pay full price for everything. I bought the rubber stamps at 50% off ! Now I have another piece of art to hang on my wall next to the salt and pepper shaker pictures my dad found for me at Hobby Lobby (see below) - also for 50%!

How-To:
1. Make sure your easel can hold the canvas first!2. Staple fabric onto back frame of canvas. The fabric sample from Jo-Ann’s fit the canvas perfectly with room to spare!
3. Stamp quote onto paper and let dry. You could also use a picture instead of a quote.
4. Spray adhesive onto fabric covered canvas-only in the area the paper is going!
5. Put paper on and make sure there are no bubbles-this is why I suggest a thick piece of scrapbook paper!
6. Attach buttons, flowers, etc.
DIY Aisle Signs
This idea came about because I wanted my sisters to carry something other than flowers down the aisle. I wanted them to make something that Eric and I could use after the wedding, instead of tossing it. I got to spend a great afternoon with my mom and sisters, and now we have a great piece of art in our home!
Supplies:
3 pack of white canvases from Wal-Mart or Big Lots - $4.17A few sheets of polka dot scrapbooking paper from Hobby Lobby - $ .29-.59 (we used clearance napkins from Target that were leftover from my bridal shower!)
Bottles of acrylic paint from Jo-Ann Fabrics in our colors, plus red paint - 4 bottles @ $1.39 each = $5.56
A bag of wooden buttons from Jo-Ann Fabrics - $4.97 regularly, it was on clearance for $ .97! Or use old buttons you have lying around (which would be free!)
A bag of 25 miscellaneous craft brushes from Wal-Mart - $4.97
Total estimated cost: $20.26 if you pay full price for everything. In my case, the paint, the scrapbook pages and the buttons were on sale so it would be less.
How-To:
1. We chose the song “Love is Here” by Tenth Avenue North because Eric loves it and (duh) I have 3 sisters and the song phrase has 3 words!2. I laid out paint, buttons and paper and told them my idea - and then let them go to town on the canvases! They loved it too.
3. This is way cheaper than flowers and I’m going to keep it forever!
4. We chose smaller signs because we didn’t want them to be overwhelmed and when they walked up the aisle, and they put the sign on an easel for all to see during the ceremony. It was also a nice filler because Eric had no groomsmen.
5. Another idea is to have your maids paint the words when they get up there…if that doesn’t make them nervous and they aren’t super slow about it.

Lindsey’s 10 Tips for an Easy DIY Wedding
a. I know that’s pretty cheesy, but spray paint can overhaul anything! Can something be cut off of it or added to it? Don’t let that goofy looking color or attached flower blind you to its potential fabulousness!!!
2. Shop clearance first!
a. I never used to have the patience to shop in the clearance section, but after finding a treasure, it’s worth it! I found about 90% of our items in the clearance sections of Hallmark, Hobby Lobby and Jo-Ann Fabrics. Remember rule number one when scouting out these places.
3. Think (and shop) in the off season
a. We had a summer wedding clearly, but we got engaged in February…leaving me to buy full price summer items right? Wrong! Being the clever and crazy gal I am- I started buying items in 2008…yep…no shame here. Originally we had talked about an early winter wedding…so I went to town and starting buying. Luckily we were able to transform 90% of those items into our summer theme. So, start shopping for winter items in January when spring stuff is coming in….this will save you tons of money- I guarantee it.
4. Coupons and email notifications can be your best friend
a. Sign up for Hobby Lobby (or Michael's) and Jo-Ann Fabric email lists because they let you know what stuff is on sale each week allowing you to maximize your shopping trips! These websites also send coupons to your email, usually 20-40% off!
b. I am hooked on a website called Hip2Save.com from my friend Dani. Something fun to look at everyday…Collin tracks freebies and shows you how to maximize coupons to get free stuff…so the work is done for you! I know I got several freebies I used at the wedding and was able to even print free pictures!
5. Less is more
a. Don’t try to do a million DIY projects because unless you are Martha Stewart - you’ll go crazy. Pick four or five important focal points for the whole day and really make those special. People can’t remember everything about your day, but they can remember a few things.
6. When you go shopping, plan to go through the WHOLE store…every aisle
a. We found so many awesome items tucked away in places we never would have thought to look! Again, if it’s kind of quirky…could it be painted? Can that goofy attachment be removed? Would it look good with something you have that needs a little something else?
7. I heart eBay and Etsy - and you should too
a. We went on eBay and found many things, most importantly my red shoes for just $12 with shipping!


a. If you have patience and a sense of adventure, shop these places! My favorite thrift store is in Van Wert, Ohio where we found a ton of stuff like:
i. Super cute mix and matched floral plates for my bridal luncheon (25 cents)
ii. Red plaid blanket for engagement pictures ($2)


a. To be honest, I don’t really get into wearing jewelry - I barely wear my wedding rings!! I must say though, I don’t like “bridal jewelry”… it all looks the same to me. I suggest shopping Rag-O-Rama, your local thrift store or Rent the Runway.
i. I rented my necklace (a $150 value) from Rent the Runway for $13.95 with shipping and I felt like a movie star!

a. We borrowed the chalkboard from my MIL’s school


*Last but not least, I think the most important advice I can give anyone involved in a wedding is to be satisfied with your own wedding! I found this article this article from OffBeat Bride super helpful - it was a real eye-opener in terms of wedding planning!
WOW! Thanks so much to Lindsey for sharing her wedding DIY's and all of her amazing tips - you are one crafty, thrifty, awesome chick!! I'd love to hear from other recent or soon-to-be real brides who would like to share their DIY projects and tips!
Wedding and engagement photography by Lydia of DIA Images, other pictures courtesy of Lindsey.


I love Fireproof also! Not to mention reliving my childhood crush on Kirk Cameron;)
ReplyDeleteI cannot believe that beautiful sash was only five bucks to make! It's absolutely incredible, I'm so impressed.
ReplyDeleteGreat new feature!! This is such a cool idea and this bride had some interesting DIY projects!! Love it!
ReplyDeleteThat's one crafty newlywed! These are so truly fabulous ideas!
ReplyDeleteDiy own dress sash, it is a good idea to have an unique and special attire for bride.
ReplyDelete